
When I started learning JavaScript and all the frontend tooling around it, I felt kind of overwhelmed by React and Vue. After trying and failing to understand React, I found Svelte, and honestly…? That changed everything.
That’s why I usually tell people to try Svelte first. It’s great to learn core concepts like reactivity, components, and state, but without a heavy learning curve. If you already know HTML and JS, it just clicks.
💡 Technically, Svelte is a compiler, not a framework. But calling it a framework makes life easier for everyone.
What you need to know first
To really make the most out of this guide, you should be comfortable with:
- Writing basic HTML, CSS and JavaScript
- Using ES6 syntax like arrow functions
- Having Node.js and npm installed
If none of that rings a bell yet, take a moment to learn those basics first.
So what is Svelte?
Svelte is a frontend compiler. Unlike frameworks like React or Vue, it doesn’t ship a runtime that interprets your code in the browser. Instead, it compiles everything down at build time into plain JavaScript.
This gives you faster apps and smaller bundles. It also makes writing code feel way closer to writing “just JavaScript,” which can be really refreshing.
Svelte apps are built from components. These are reusable pieces of UI that combine logic, markup, and style. Think of them as files that hold a little chunk of your app (like a button, a card, or a page).
The easiest way to start: Svelte REPL
Before installing anything, go to the REPL. It’s an online editor where you can play with Svelte code.
When you open it, you’ll see something like this:

On the left, your code. On the right, the output.
At the top there’s a <script> tag, that’s where your logic goes. Below it, you see a heading displaying a variable with {name}. The syntax is readable if you’ve written HTML and JS before. It feels like vanilla code.
Anatomy of a Svelte component
Try out this code in the REPL:
<script>
	let count = 0;

	const increment = () => {
		count++;
	};
</script>

<button on:click={increment}>
	You clicked me {count} times!
</button>
That’s a full component. You have the logic (<script>), the markup (<button>), and dynamic state, {count} will update in real time.
Here’s how it looks when you run it:

Now let’s add some style:
<style>
	button {
		padding: 1rem 1.75rem;
		font-family: "Rubik", sans-serif;
		font-size: 1.25rem;
		font-weight: 300;
		color: #fff;
		background-color: #6930c3;
		border: none;
		border-radius: 0.5rem;
	}
</style>
The styles are scoped. That means they don’t affect anything outside of this file.

A Svelte component usually has up to three parts: script, markup, and style. All optional, all scoped.
Creating reusable components
Let’s say we want to turn that button into a generic component we can use anywhere.
Create a new file called Button.svelte:
<button on:click>
	<slot />
</button>

<style>
	/* ...styles from earlier */
</style>
We use a <slot /> to tell Svelte where to render children passed to the component. on:click is left open, so it can inherit click handlers from its parent.
Now create Counter.svelte using this button:
<script>
	import Button from "./Button.svelte";

	let count = 0;
	const increment = () => count++;
</script>

<Button on:click={increment}>
	You clicked me {count} times!
</Button>
Now put it all together in App.svelte:
<script>
	import Counter from "./Counter.svelte";
	import Button from "./Button.svelte";
</script>

<Counter />
<Button>Another button!</Button>
Props
Let’s make the count value customizable. In Counter.svelte:
- let count = 0;
+ export let count = 0;
Then in App.svelte:
<Counter count={15} />You can even pass it from a variable:
<script>
	const count = 15;
</script>

<Counter {count} />
Two-way binding
Passing data down works fine. But what if you want updates to flow back up?
Let’s say you want to show the current count outside the component:
<script>
	let count = 0;
</script>

<Counter {count} />

<p>The count is: {count}</p>
That won’t work. The variable inside Counter updates, but App’s count stays the same:

To sync them, use bind::
<Counter bind:count />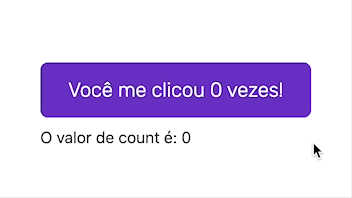
Setting up Svelte locally
You can start a Svelte project with Vite:
npm create vite@latest my-app
cd my-app
npm install
npm run dev
Install these VS Code extensions if you’re using it:
File structure
Here’s how it works:
- main.js: where Svelte mounts your app
- App.svelte: your entry component
- lib/: a folder for your components
Looping over lists with #each
Let’s create UserCard.svelte:
<script>
	export let name;
	export let email;
</script>

<div class="user">
	<img
		class="avatar"
		src="https://avatars.dicebear.com/api/adventurer-neutral/{name}.svg"
		alt="Avatar of {name}"
	/>
	<p class="nickname">{name}</p>
	<p class="email">{email}</p>
</div>
Now create a list in UsersGrid.svelte and use #each:
<script>
	import UserCard from "./UserCard.svelte";

	const users = [
		{ name: "DoceAzedo", email: "[email protected]", isAdmin: true },
		{ name: "John Doe", email: "[email protected]" },
	];
</script>

<div class="grid">
	{#each users as user}
		<UserCard name={user.name} email={user.email} isAdmin={user.isAdmin} />
	{/each}
</div>
Conditional rendering with #if
You can conditionally render markup like this:
{#if isAdmin}
	🌟
{/if}
And dynamic classes:
<div class="user" class:admin={isAdmin}></div>
Lifecycle: onMount
Use onMount() to run code when a component is rendered.
<script>
	import { onMount } from "svelte";
	let users = [];

	onMount(async () => {
		const resp = await fetch("https://jsonplaceholder.typicode.com/users");
		users = await resp.json();
	});
</script>
Next steps
You now know:
- Svelte syntax and structure
- How to build and reuse components
- Binding and events
- Conditional and dynamic rendering
- Lifecycle hooks
Check out:
- Stores
- Transitions
- Advanced slots
- Context API
- SvelteKit for fullstack Svelte
Explore the docs, try building something, and vibe with it. The full source for this post is in this REPL. Happy building!